Biology > Lab Report > BIOL 1020LLab #2 Microscopy for Microbiology – Use and Function Explore Optical Microscopes. (All)
BIOL 1020LLab #2 Microscopy for Microbiology – Use and Function Explore Optical Microscopes.
Document Content and Description Below
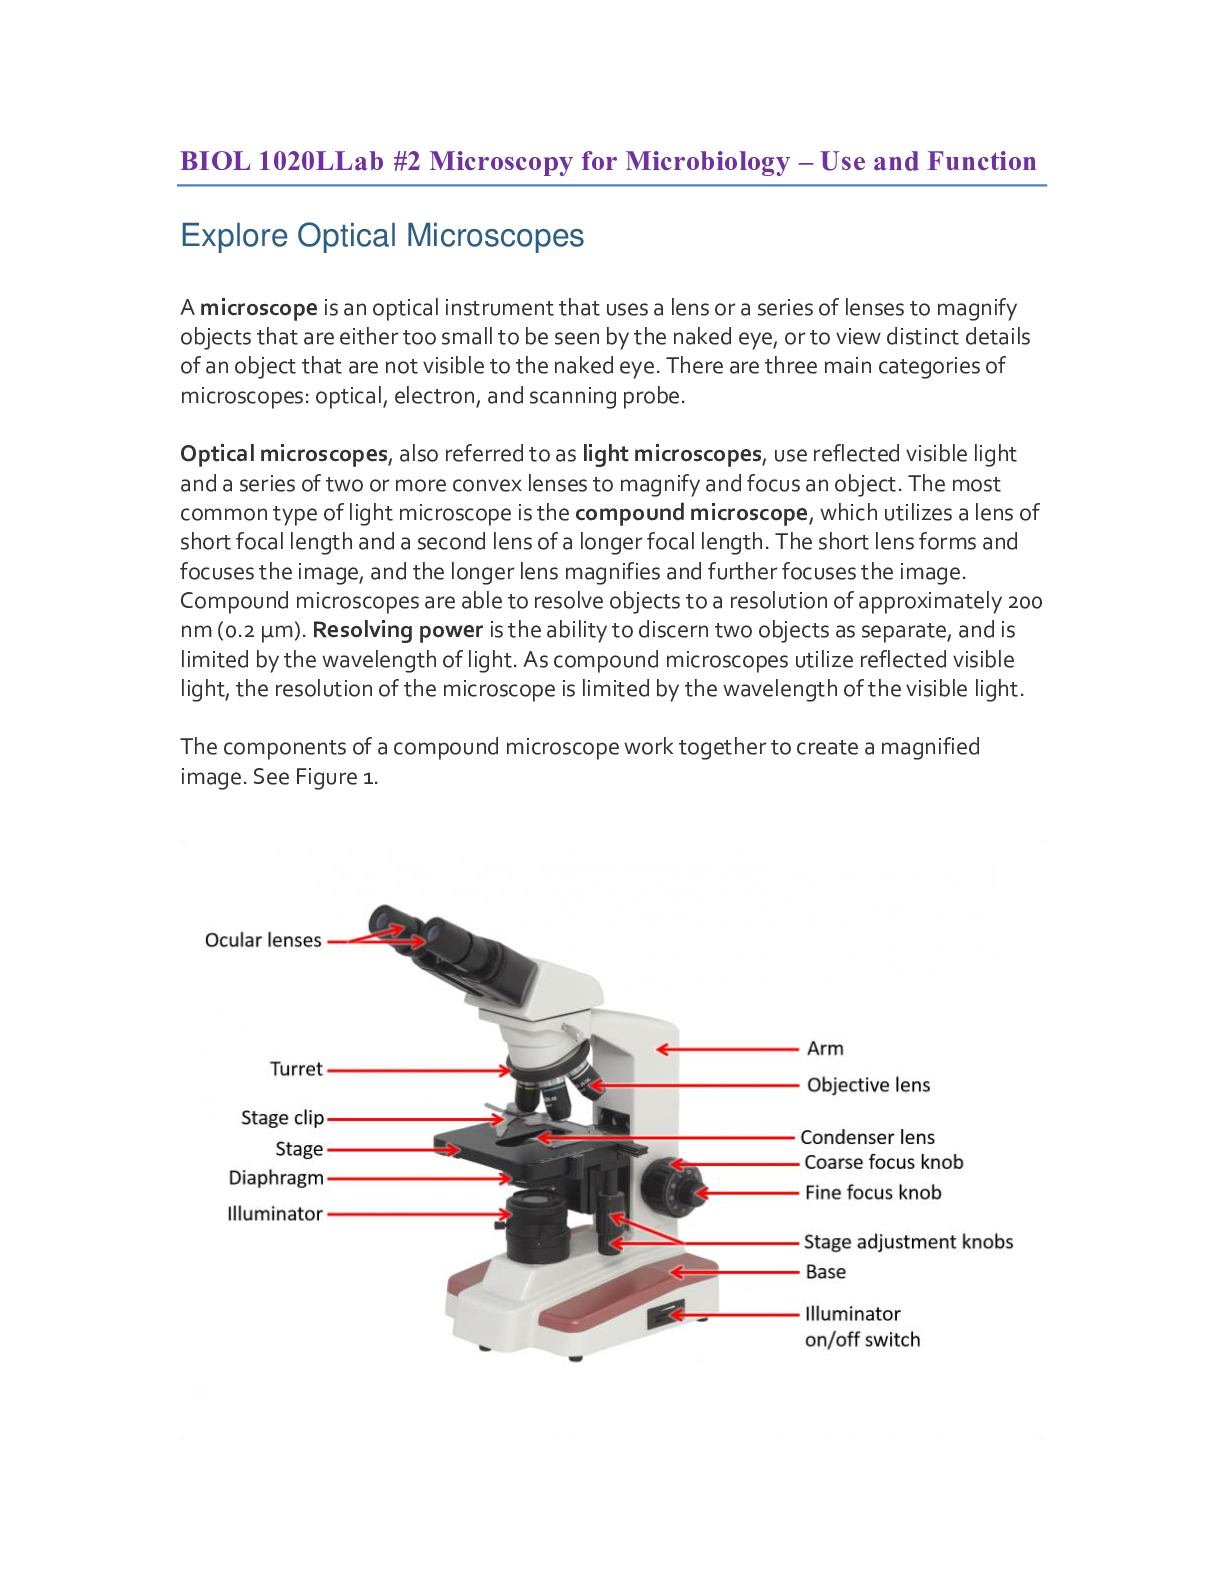
BIOL 1020LLab #2 Microscopy for Microbiology – Use and Function Explore Optical Microscopes A microscope is an optical instrument that uses a lens or a series of lenses to magnify objects that a... re either too small to be seen by the naked eye, or to view distinct details of an object that are not visible to the naked eye. There are three main categories of microscopes: optical, electron, and scanning probe. Optical microscopes, also referred to as light microscopes, use reflected visible light and a series of two or more convex lenses to magnify and focus an object. The most common type of light microscope is the compound microscope, which utilizes a lens of short focal length and a second lens of a longer focal length. The short lens forms and focuses the image, and the longer lens magnifies and further focuses the image. Compound microscopes are able to resolve objects to a resolution of approximately 200 nm (0.2 μm). Resolving power is the ability to discern two objects as separate, and is limited by the wavelength of light. As compound microscopes utilize reflected visible light, the resolution of the microscope is limited by the wavelength of the visible light. The components of a compound microscope work together to create a magnified image. See Figure 1. Explore Microscope Components The ocular lens is located at the top of the microscope. This short lens is termed “ocular” as it is the lens that one looks through in order to view the image. An ocular lens is typically 10x or 15x power and is often referred to as the eye piece. A microscope with one ocular lens is called a monocular microscope, a microscope with two ocular lenses is called a binocular microscope (as shown in Figure 1), and a microscope with two ocular lenses and a location for a camera is called a trinocular microscope. The objective lenses of a microscope are found closest to the stage and are held by the turret, or revolving nose piece. The turret allows the lenses to be easily rotated to select the lens that offers the necessary power of magnification. There are typically three to four objective lenses on a microscope, ranging in power from 4x to 100x. The lowest power objective lens (4x) is the scanning lens, the medium strength objective lens (10x) is the low power lens, and the highest strength objective lens (40x) is the high power lens. If a fourth objective lens is present it is typically the 100x oil immersion lens. Oil immersion lenses are typically spring-loaded and retractable, so that the end of the lens will retract if it comes into contact with the object, protecting both the slide and the lens from damage. Additionally, an oil immersion lens is generally sealed, keeping the oil from seeping into the lens. The total magnification factor of a microscope is calculated by multiplying the magnification of the ocular lens with the magnification of the objective lens. For example, if the ocular lens has a magnification of 15x and the objective lens has a total magnification of 40x, the total magnification factor is 600x: 15 x 40 = 600. Related to the total magnification factor are the field of view and depth of field. The higher the total magnification factor, the smaller the field of view. For example, imagine looking at a book at a distance of 3 feet. At this distance there is a large field of view, or the visible area that can be observed. In this case, the entire book is visible, along with its location relative to other objects. As the distance between your eye and the book is decreased, so is the field of view. If you are holding a book only an inch from your eye, not only is there a loss of dimensionality (from 3D to 2D), only a few words on the cover will be visible instead of the entire book. This is analogous to viewing an object with a microscope: by increasing the magnification, the field of view (or amount of the object seen) is smaller, and more detail is visible. Depth of field refers to the distance range that is in focus at a given time. This concept is also relevant in photography, where a photographer can adjust the depth of focus to have either a shallow focus that will emphasize a subject, or a greater focus, that will focus to include much of the foreground and background. Like field of view, the depth of view is dependent on the total magnification factor. Compound microscopes have an inherently shallow depth of field, on the order of only a few micrometers. See Figure 2. Figure 2. Depth of field.The left image shows a shallow depth of field. Notice that everything but the hand is out of focus.The right image shows a greater depth of field. Notice that not only is the hand in focus, but the surrounding image is as well. Note the focus of the buttons on the suit. The arm of a microscope supports the lenses of the microscope and connects them to the base of the microscope. The base is the bottom of the microscope, which provides support to the instrument. When moving a microscope from one location to another, place one hand around the arm, and the other under the base. The object (mounted on a slide) to be viewed with the microscope is placed on the stage. The stage is the flat platform with stage clips to hold the slide in place. A mechanical stage is a movable platform that allows the user to move the slide left and right, or forward and backward, by turning the stage adjustment knobs. This feature is useful for moving a slide in small increments, and also for recording and relocating the slide to a specific point of interest. The illuminator is the light source (plug-in light, battery-powered light, or mirror to reflect light), which illuminates the object. The condenser lens sits just below the stage, and focuses the light from the illuminator onto the slide. The diaphragm sits below the stage and the condenser lens. It is composed of overlapping pieces of metal or plastic that move to vary the amount of light projected toward the condenser lens. Microscopes with a diaphragm have a small lever that is used to change the size of the opening, which adjusts the intensity of light. While there is not a set amount of light required to view slides, the intensity of light is a personal preference of the person using the microscope. See Figure 3. Figure 3. Diaphragm.The photo on the left shows the diaphragm letting little light through.The right-hand photo shows the diaphragm letting much more light through. The focus adjustment knobs adjust the distance between the slide and the object lens, by moving the stage up and down. The coarse adjustment knob (coarse focus knob) is used when larger amounts of focus are needed and moves the stage a greater distance than the fine adjustment knob (fine focus knob). The fine focus knob is used for focusing at higher powers of magnification and moves the stage in very small increments. Materials Read through the procedures listed in the exercises on the next pages before beginning. Then, gather all of the materials listed below and begin Exercise 1. Note: The packaging and/or materials in your kit may differ slightly in appearance from images in the experimental procedures. Student Supplied Student Supplied • 1 Bottle of distilled water • 1 Camera, digital or smartphone • 1 Microscope* • Oil immersion lens* • 1 Roll of paper towels HOL Supplied • 2 Blank slides • 1 Booklet of lens paper (50 pcs) • Cover slip cube (20 pcs) • 1 Pair gloves • 1 Pair of safety goggles • 1 Ruler • 1 Small graduated pipet, 5 mL • 1 Sterile swab, 2 per pack • 1 Slides to view: 1 Amoeba, whole mount 1 Bacteria bacillus form 1 Bacteria coccus form 1 Bacteria spirillum 1 Letter e focusing slide 1 Penicillium with Conidia 1 Yeast, whole mount Exercise 1 Getting to Know your Compound Microscope In this exercise you will identify and describe the components of a compound microscope. You will calculate the total magnification and diameter of field. You will then practice focusing your microscope on a prepared slide. Procedure Part 1: Microscope Components 1. Gather the microscope. Assemble the microscope (if necessary). 2. Use the information in the background section, a text book (as necessary), and the image of your student microscope in Figure 1, to identify the name of each of the lettered components of Figure 4. Record the name of each microscope component in Data Table 1. Figure 4. Student compound microscope, with letters. Use for Data Table 1. 3. Describe the function of each identified microscope component in Data Table 1. 4. Look at the ocular lens and each of the objective lenses of your microscope. Determine which of the objective lenses are the scanning power, the low power, and the high power. Make sure to include the oil immersion lens in your observations. 5. Record the power of magnification of each of the lenses in Data Table 2. 6. Calculate and record the total magnification for each of the different lens combinations in Data Table 2. Note: If assistance is necessary, review the information provided in the background section. Part 2: Calculating the Field of View 7. Place the metric ruler onto the stage of the microscope so that the metric side of the ruler (mm markings) is in the center of the light path. Note: The ruler must rest on top of the stage, and thus must be manually held in place. Do not try to affix the ruler under the stage clips. Note: The field of view is the circle visible through the lenses. The diameter of field is the length of the field from one edge of the circle to the other, passing through the middle of the circle. See Figure 5. Figure 5. Field of view. Align the middle of the markings to the center of the circle. 8. Focus the ruler with the scanning lens. Note: It may require minor adjustments to clearly focus the ruler. Make sure to adjust both the stage adjustment knobs and the focus knobs as necessary to obtain a focused view. 9. Record the approximate field of view for the scanning power in millimeters in Data Table 3. 10. Convert the field of view from millimeters to micrometers and record in Data Table 3. Note: 1 millimeter is equal to 1000 micrometers. 11. Repeat steps 8-10 for the low power lens. 12. Use the following formula to calculate the field of view for the high power lens and record in Data Table 3. 13. Convert the field of view from millimeters to micrometers and record in Data Table 3. Part 3: Focusing and Using the Microscope 14. Identify the “Letter e” slide in your slide box. Note: Use the lens paper, as necessary, to wipe the slides prior to placing them on the microscope. 15. Place the “Letter e” slide on the stage, between the stage clips, and turn on the light. See Figure 6. Figure 6. Student microscope with slide and illuminator on. 16. Switch the objective lens to the scanning power and use the focus adjustment knobs, as necessary, to focus the image on the slide. 17. Take a photo of the slide. See Figure 7. Figure 7. Photograph of “Letter e” slide as taken with a digital camera through microscope eyepiece. 18. Upload the image into Photo 1. 19. Using your observations, describe the details that are visible when viewing the slide at scanning power in Data Table 4. 20. Switch the objective lens to low power, and use the focus adjustment knobs, as necessary, to focus the image on the “Letter e” slide. 21. Repeat steps 17-19. Upload the image into Photo 2. 22. Switch the objective lens to high power and use the focus adjustment knobs, as necessary, to focus the image on the “Letter e” slide. 23. Repeat steps 17-19. Upload the image into Photo 3. Install the oil immersion 100x objective lens in place of the scanning lens. 24. Apply a drop of immersion oil on the specimen slide and turn the revolving nosepiece to bring the 100x lens into position. 25. With the lens tip touching the oil, focus with the fine adjustment knob. 26. Repeat steps 17-19. Upload the image into Photo 4. Cleanup: • After using the oil immersion lens replace it with the scanning power lens and wipe the immersion lens tip with lens paper. • Clean the slide with soap and water and return it to the kit. Exercise 1 - Questions 1. Describe the details in the slides "Letter e" that become visible as the power changed from scanning power, to low power, to high power. As the power increased the letter e began to show small black specks around the letter and small black specks on the edges of the letter. 2. Why is it important to calculate the diameter of the field when first using the microscope? So that you know the depth of field. Exercise 2 Viewing Prepared Microbe Slides In this exercise you will view a series of prepared slides to gain proficiency with observing microbes. Procedure 1. Gather the microscope, oil immersion lens, immersion oil, lens paper, and the following prepared slides: “Amoeba, Whole Mount”, “Penicillium with Conidia”, “Yeast, Whole Mount”, “Bacteria Spirillum”, “Bacteria Bacillus Form”, and “Bacteria Coccus Form”. 2. Place the “Amoeba, Whole Mount” slide on the microscope state and focus under scanning power. 3. Refer to Figure 8 when locating the microbe on the slide. Figure 8. Amoeba, Whole Mount at 100x magnification. 4. Switch the objective lens to the low power and focus on the microbe. 5. Switch the objective lens to high power and focus on the microbe. 6. Replace the scanning power objective with the oil immersion lens. 7. Add a drop of immersion oil to the slide and move the 100x lens into position. Adjust the fine adjustment knob as needed to bring the image into focus. 8. Determine which objective lens is best for viewing the specimen and take a photo of the image. 9. Upload the image into Photo 5. 10. Record the objective and total magnification used for the photo in Data Table 5. 11. Replace the oil immersion lens with the scanning lens and wipe the removed lens tip with lens paper. 12. Replace the “Amoeba, Whole Mount” slide with the “Penicillium with Condidia” on the microscope stage and focus under scanning power. 13. Refer to Figure 9 when locating the specimen on the slide. Figure 9. Penicillium with Conidia under 400x magnification. 14. Repeat steps 4-11 for this slide. Upload the image into Photo 6. 15. Replace the “Penicillium with Conidia” slide with the “Yeast, Whole Mount” slide on the microscope stage and focus on scanning power. 16. Refer to the image in Figure 10 when locating the specimen on the slide. Figure 10. Yeast, Whole Mount under 400x magnification. 17. Repeat steps 4-11 for this slide. Upload the image into Photo 7. 18. Replace the “Yeast, Whole Mount” slide with the “Bacteria Spirillum” slide on the microscope stage and focus on scanning power. 19. Refer to image in Figure 11 when locating the specimen on the slide. Figure 11. Bacteria Spirillum under 400x magnification. 20. Repeat steps 4-11 for this slide. Upload the image into Photo 8. 21. Replace the “Bacteria Spirillum” with “Bacteria Bacillus Form” on the microscope stage and focus on scanning power. 22. Refer to Figure 12 when locating the specimen on the slide. Figure 12. Bacteria Bacillus Form under 400x magnification. 23. Repeat steps 4-11 for this slide. Upload the image into Photo 9. 24. Replace the “Bacteria Bacillus Form” slide with the “Bacteria Coccus Form” slide on the microscope stage and focus on scanning power. 25. Refer to Figure 13 when locating the specimen on the slide. Figure 13. Bacteria Coccus Form at 400x magnification. 26. Repeat steps 4-11 for this slide. Upload the image into Photo 10. 27. Remove the “Bacteria Coccus Form” slide from the microscope. Cleanup: Clean and store all slides in the box provided. Exercise 2 - Questions 1. Using the field of view calculated in Exercise 1 for the high power lens, approximately how far across are each of the cells in the Bacteria Coccus Form slide in Photo 10? Show your calculations. I am not entirely sure how to calculate using the virtual microscope since there is no ruler that we are able to measure. 2. Detail techniques you found helpful for focusing on the various slides in this exercise. I found it easiest to use the arrows on my keypad to focus in and out slowly in order to get the best view at each power. Exercise 3 Wet-Mount Slides In this exercise you will create wet-mount slides of cheek cells and tooth plaque and observe them under the microscope. Procedure 1. Gather your microscope, two blank slides, the cover slip cube, a long-stemmed pipet, 1 pack of sterile swabs, a pair of gloves, the safety goggles, paper towels and distilled water. 2. Place a sheet of paper towel onto your workspace to prevent the slides and cover slips from getting scratched. 3. Put on your gloves and safety goggles. 4. Gather a clean slide and cover slip and place them onto the paper towel. 5. Use one sterile swab from the package to gently scrape a few cells from the inside of your cheek. 6. Smear the swab containing the cheek cells onto the microscope slide. Carefully add one drop of distilled water with the long-stemmed pipet to the smear. 7. While holding the coverslip upright, carefully place one edge of the cover slip next to the water drop on the slide. As the drop of water comes into contact with the cover slip, the water will wick along the junction of the cover slip and the slide. See Figure 14. Figure 14. Preparing a wet-mount slide. 8. Slowly lower the upper edge of the cover slip onto the water droplet. 9. If there is excess water, place a paper towel at the edge of the cover slip to draw out the excess water. This will further flatten the wet-mount slide. 10. Place the prepared slide on the microscope stage, between the stage clips, and turn on the light. 11. Focus on the cells under scanning power. 12. Refer to Figure 15 when locating the cells on the slide. Figure 15. Cheek cells at 400x magnification. 13. Switch the objective to low power and focus on the same cells. 14. Switch the objective to high power and focus on the cells. Note: It may be necessary to reduce to the amount of light under the slide to clearly see the unstained cells. Cleanup: Exercise 3 - Questions 1. Describe the similarities and differences between the cheek cell wet mount and dental plaque wet mount. 2. How did the process of preparing wet-mount slides become easier as you prepared the second wet-mount slide of this exercise? [Show More]
Last updated: 1 year ago
Preview 1 out of 16 pages
Reviews( 0 )
Document information
Connected school, study & course
About the document
Uploaded On
Feb 14, 2021
Number of pages
16
Written in

Additional information
This document has been written for:
Uploaded
Feb 14, 2021
Downloads
0
Views
166

 (1).png)


 (1).png)

.png)
.png)